Thứ Sáu, 9 tháng 4, 2010

Bridal gown

W012b


W012a


I haven't been making wedding bridal gown cards for quite some time now. I have been getting quite a number of requests from customers who are interested in this design for their wedding. But at the moment I am just not able to do them because I don't have enough time to do bulk orders for one particular customer. So I just prefer to do wedding cards that are meant to be given to brides and congratulate them on their wedding. :)

The material I used to make the bridal gown is doily paper. There are a lot of types of doily paper in the market. I found this new pattern which I quite like and have made a wedding gown out of it recently for one of my wedding card designs. So now I'm using the same one to make a bridal gown for this small wedding card. As you can see, the shape of the gown is similar to my old wedding card designs, the only difference is the pattern of the doily paper. Another difference is that I layered the wedding gown with a white organza to get that shiny effect. Usually I would layer it with metallic silver or gold paper. I wrote the wordings at the side of the wedding gown "happily ever after" as a wish for the lucky bride :). It's handwritten using a gold metallic pen. Love that! 


Happy 31st Anniversary....

AC001a

I was requested to do this design which is the exact same design as AC001 except that I was asked to change the wordings a bit. The wordings at the outside was changed to "Happy 31st Anniversary" because this card was intended to be given to another couple's anniversary. I was also asked to put their names together with the wordings but I thought that it would be too crowded to have them all together like that so I separated the wordings to be half outside and the other half inside. So their names were placed at the two big heart shape pop ups inside the card as you can see at the photo above. In my previous anniversary card design, at those two big hearts, I would usually write the dates of their anniversary. So this time I did something different by placing their names instead. And I love it that way :)

Thứ Năm, 8 tháng 4, 2010

April 2010 Blog Giveaway!!!


Hello again my lovely readers!! It has finally come again for the 4th time this year.......it's my April 2010 Blog Giveaway!!!! Yes!! :D Sorry it took longer than usual to do this blog giveaway this month.  It was suppose to be on the 1st of every month.....but since I have been so busy for the past few weeks....didn't have the time to do the giveaway at that time. Right now I have some little time away from work so I get to work on this giveaway today. :)
This time around, I'm giving away prizes for four lucky winners. I've decided to giveaway two lovely cute wedding cards this time around for each of the four winners. This is a new design and never been sold before. Have a look at the wedding dress, I am using a new doily pattern since the old ones are no longer in stock.

Here is how you can win these lovely cards. The rules are the same as the one I did previously . I will give one entry for participants who blog about my giveaway in their respective blogs. You can earn an entry by following the simple steps below....

1.You must "FOLLOW" this blog / "BE A FOLLOWER" and leave a comment on this post. You  must  write a comment or give suggestions regards to my card blog. Be sure to also write your name and your valid email address at your comment. Then you must blog and link about this giveaway at your blog, and link your post at your comment too.

All the best of luck to all participants! This giveaway ends on the 16th of April 2010 at 11.59pm. A winner will be chosen by a lucky draw. The name of the winner will be announced on the 17th of April 2010......Thank you!!! :)))))


XOXO
Lin

Thứ Ba, 6 tháng 4, 2010

King for a day!


HB068

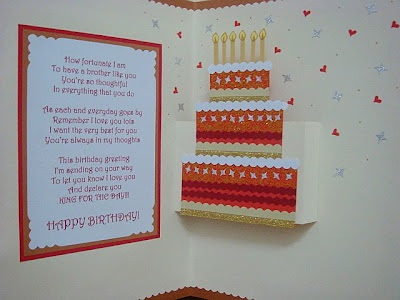
This is a treat to do! Another new theme in my collection :). Medieval King theme. It was inspired by the birthday wish that my customer wanted me to print inside the card. She gave me the wordings that was about her brother being King for a day on his birthday. The wordings were really nice! So I thought, why not have the subject matter be connected to the wordings? Wouldn't that be nice and something new. So after she agreed with my suggestion, I also asked for her brother's photo so that it would look similar to him. Well, I tried my level best......I think the lips resembles the real person hihihihi..... :)

I also did a pop up cake.....vertically instead of doing it horizontally. This is a first for me to do it vertically like that. So since the pop up square is flat, I can't make the cake look like the usual pop up  3 tier birthday cake I usually make. Hence the candles can only be placed at the top of the tier instead of placing them on each tier. I would have done the usual 3 tier pop up birthday cake but since I had to put the wordings at the side, I was not able to do the usual pop up cake. If the wordings were little, probably I could. But this one was quite a lot and required a lot of space. I also decorated the cake with a lot of gold glitter glue. Lots of it.....so the cake looks so sparkly and shiny! hihhihihi! Love that effect!

Pop up wedding cake....

W011

I am super excited about this design.....it is a request from my customer to make a wedding card for her brother who will be getting married soon. Honestly, I didn't have an idea of how to do the design until yesterday the idea popped up in my head. hehehehe.....My customer decided on the color combination earlier on....she wanted it to be in black and white. But I added silver, gold and grey in it as well.

I've always wanted to use the doily to make a wedding gown like this. So finally I get to do it today. It's also a first time for me to do a groom together with the bride.....usually I would only do a wedding gown using doily paper. I guess it was easier that way. :) But now I've tried something that is new to me. Ever since I've been doing a lot of figure drawing for my card designs, I've less fear of doing it. So, I hope to be better at this as I go along. After all it does take a lot of practice and practice to be good at something. :)

This is also the first time for me to do a wedding cake. I've been doing a lot of birthday cakes but no wedding cakes before. So for a wedding cake I have no need to put any candles on it at all....I decided that I wanted to decorate it using a glittered organza. Wrapped it around the cake and then decorate it with ribbons and heart shape paper. It was easy to do. :) A simple square pop up.


Chủ Nhật, 4 tháng 4, 2010

Cupcake cards!

HB066


HB067
I got a request from a customer who was interested in my HB010 birthday card. She wanted two of them but in a different color combination. One will be a combination of purple and pink and the other will be a combination of purple and orange. I tried my best to get it right and make it look harmonize.

I did do the design a little differently this time around. I changed and added a few new things in the original design. The icing of the cupcake, I made it using foam. If you look at the original design, I only used paper, a thick paper, because at that time, I didn't even know that the foam existed in the market...hihihihi....and perhaps also, at that time, it was not so widely sold at stationary shops. So I only used a thicker piece of paper for the icing. But now, it's much more fun to use foam :). The lower part of the card, I decorated it with strips of colored paper of different color combination to fill up the empty space at the bottom. In the original design, I decorated it with gold dots. I think these changes are better than the original. At least I would like to think they are hihihihi! I love them...very simple and sweet! :)


Thứ Bảy, 3 tháng 4, 2010

Manchester United theme


HB065

For all MU fans! :) This is a creation that is almost identical as the Arsenal theme birthday card I made a while back. As you can see I made some minor adjustments here and there to turn it into a MU theme birthday card as requested by my customer.

The pop up I made is the same as the Arsenal theme card I made before except that I made some changes inside the pop up card.....there is no red lips whatsoever hihihihihi......only hearts and MU logos....I even got carried away with the decorations that I simply forgot to leave some space on the right side of the card for my customer to write anything in there....oh dear!!!! I hope she can still write in there somehow huhuhuhuhu.....but, I guess it looks nice that way rather than only doing half of the design on the left side and leaving a blank page on the right. Oh well.....I just hope she is happy with what I did coz I surely am :)