Thứ Ba, 11 tháng 5, 2010

Glitter glue

 Photo A
 
 Photo B

 Photo C

Photo D

 Photo E

  Photo F

I am writing this entry in response to my fellow blogger Evelyn of Purple Collection who inquired about glitter glue. I thought perhaps if I blogged about it here then at least more people can benefit from this inquiry hehehe. Well....at least I hope so that this entry can help hehehe....if not much as least a little bit. :)  I myself am still doing research on it and am still learning. 

Well.....as you can see from the photos above, these are the glitter glues and glitter powders that I have in my collection. I've been collecting these over the past few years. In my search for craft materials, I've come across with a few types that actually are great for card making and have stuck with the product till now, but some of which I will never buy again because of it's lack of performance. What I mean is, the product does not look great when applied on the paper or card. Ok, I will try and explain about the products above one by one below.

PHOTO A:
So far....this type of glitter glue is my most favorite at the moment. I use it a lot for my handmade cards lately. The glitter inside the glue are quite fine in size and good in quality. The glue itself is very fluid and flows really well from the bottle. I'm loving it so much :) When it dries, it give a really sparkling effect. I bought this in a stationary shop in Alor Setar. It is also available in other craft shops in Kuala Lumpur. This product is not that expensive either. Very affordable.

PHOTO B:
Ok...this glitter glue I don't really fancy but it's good enough for certain occasions. I don't use it a lot for my cards but at certain times I think it can be useful......but so far, I don't really like this type because the glue is quite think and not fluid. The glitters in it are quite fine in size though....so that's the only reason why I bought it. But when it comes to performance......it lacks. :( I remember buying this at SOGO, Kuala Lumpur.....they have quite a lot of glitter glue sold there at the stationary department there.

PHOTO C:
Ok...this one is a glitter paint.....I bought years ago.....way back when I was studying in ITM!!! hahaha! Imagine....that must have been at least 12 years ago.....huhuhu.....but surprisingly it is still in good condition till now. What I love about this product is that it gives a 3D effect. They have a glitter type (with glitter in it) and also a pearl  shine type (no glitter powder in it) as well.  I bought these in a art supply shop in Shah Alam. I can't remember the name of the shop. But till now I have not come across this product in any of the craft shop I've been to. I've tried searching for it in Kuala Lumpur but failed to find it. If anybody out there knows where I can get these. Please let me know :) I want to buy some! But I do know one thing though....this product, even though is small in size, it is very expensive compared to the rest of the glitter glue you see above because it does not only can be used for paper, but it can also be used on other materials like on fabric and plastic. :)

PHOTO D:
This type of glitter glue are sold in almost all the stationary shops I've been to in Kuala Lumpur. You can also find it sold at Mydin Stores.....hehehe.....that's where I found it. It's quite cheap but.......but unfortunately it does not rise to the occasion. The glue is not that fluid.....it's quite thick and not easy to apply on paper. I personally do not like to use this anymore.

PHOTO E:
This is another type of glitter glue.....I bought this at SOGO, Kuala Lumpur. It says that it's a metallic type of glitter glue so I gave it a try. It does give that metallic type of shine.....there is no glitter powder in it.....it just shines when it dries and give a metallic effect. That's all. Again, this type of product is not my favourite to use because the glue is not that fluid. This product is cheap though.

PHOTO F:
Last but not least........the glitter powders. It comes in a few colors. I bought these at Mydin Store. Believe it or not, this is what I used before I even knew about the glitter glue. hahahaha......I wanted the glitter glue effect that I see in craft magazines.....but since I didn't know where to get the glitter glue, I used the glitter powder instead. So what I did was, I mixed the glitter powders with clear transparent glue! hahahaha! That was really messy! But at least I tried!!! Messy or not, as long as I get the effect I wanted. LOL!

Ok.....I hope I have answered the inquiry hehehe.......if I have anymore infos about the glitter glue, I will add it in this post again. I hope anyone who have more infos on glitter glue would drop by and give suggestions regarding this product and tell us where we can get them. I hope we can share our knowledge together so that we can create better art work in future. :)

Chủ Nhật, 9 tháng 5, 2010

Paper quilling flowers....

Dark pink and white flowers

Dark pink and blue flowers

Ok! As promised! Here they are! Woohoo! hehehe! Aren't they so simple??? Yup.....that's simple enough for me to do for now. I'll try and do the complicated designs when I'm ready. Cheeewaaaahhhh!!!! Berangan!!! LOL! For the time being, I'm just going to practice and practice some more with this technique. I can't be an expert on this technique overnight right??? Impossible laaaaaaa.....coz it takes a lot of practice to be able to get it right. :)

I showed these cards to my Mom this morning and she just smiled like a little girl.....as giddy as a school girl hahahahaa......she said she couldn't decide which flower color she loved best because she thought that both colors looked nice. I prefer the white and dark pink combination!! I think that one is nice hehehehe! These cards can be used for any occasion.....it's a small note size card.....can be used as a thank you card or for teachers' day card or for any occasion for that matter. All I need to do is write something on the inside...hehehe.

I'm loving this technique right now because for one reason, I can use up my thin paper stocks that I have loads of right now at home. So I don't need to get new materials to do this......save my money la in other words hahahaha. Another reason is that, I love how it looks.....the 3D effect it gives....and also because it looks like embroidery if you look at it from far hehehe.....well.....that's how I see it la.....some of the quilling designs I see online looks like embroidery patterns......they are so beautiful! :)

Well, I hope to be able to do more of this in future.......if I can find the time la...hehehe.....coz I'm so busy with keeping up with the orders right now. So whenever I need some break from work.....I will do this quilliing....it's like therapy you know.....when you are comfortable with the technique....you will feel like it's a therapy for you hehehe...... ;)

Experimenting with quilling.....


Last night I stayed up till 1.00 am experimenting with the quilling technique hehehehe..... It was tough!!! Believe me it was tough at first......the first few tries were a complete waste of paper and I got so upset I threw it all away huhuhu..... :(. I made a mistake at first coz I didn't realize that I'm not suppose to make the width of the strips too big. I thought that it would be easier for me to cut the strips wider.....so it would be faster for me to cut them that way.....but when I coiled it....I could see that the coils were too high up. I was afraid that if the flower arrangement I made was too high, it won't be able to fit in the envelope. So I cut the strips again and this time I made the width less wider. So that's how you see the coils above are of good height. It's just nice.

I ended up using the tight circle shape (a peg), to make the flowers because the tear drops shape were so difficult for me to do and maintain a standard tear drop shape. Some were a bit too small and some were a bit too big, thus not suitable for making a flower. I think I've recognized my mistakes and will try again today making the tear drop shape. I made the shape of the "eye" or "marquise" for the leaves of the flowers. That one was quite simple to do.....after doing quite a lot of those, I finally understand how to do this technique. Phew!

My fingers hurt too after doing this hahahaha......but I guess I knew it was inevitable because just imagine I have to cut those small paper strips one by one using a razor....if I had a paper shredder, it would be easier and faster...hehehe. A lot of patience needed for this type of technique.....and you have to be the meticulous type as well.....so that the paper strips won't get out of shape when you cut them up. I showed my Mom what I did and she just shook her head with astonishment! She said she would never do this type of thing.....it's too much of work......but then again, so is all the other technique I've done before! LOL! It all involves a lot of work....especially making pop ups......everything is time consuming la Mom! haiyaaaaa......hahahaha......

I'll post later the photos of the cards I made using the coils I did last night hehehe........ the designs I made were extremely simple....but I love it anyways because I MADE IT MYSELF!!! hahahahaha! I'm so silly! LOL!

Thứ Bảy, 8 tháng 5, 2010

Interesting Blog Award :)


I was really surprised today when I saw a message in my chatbox from Jaja of  feltcabin.blogspot.com. She said I won an award and I'm suppose to grab this award at her blog.....Golly! An award?? Thank you so much Jaja for giving this award to me! Appreciate it very much hehehehe! I've never won any award before. So it's nice! ;)

So I quickly went to her blog to check what this award was all about. It was an "Interesting Blog Award" hehehhe....I've never heard of it before.....but it sure does sound interesting. I'm suppose to hand out this award to other fellow bloggers whom I find have blogs that are interesting to me. Hmmmm....that would be hard to pick since I have quite a handful of blogs that I find interesting. But since my favourite number is 4......so I'll just choose my top four most interesting blog. It has to be an active blog as well.....hehehehe. ;)

These are the things that I have to do:

Terms and condition for this award:
  1. Thank and link the person that give you this award.
  2. Pass this award to all blogger you've discovered.
  3. Contacts said blogs and let them know they've won this award.
  4. State 7 things about yourself.
Condition number 1 ----> DONE!

Condition number 2 ---->  DONE!
                                          1. Mangosteenskin
                                          2. Miyyah@Kertas
                                          3. Cupcake craft and Handmade Cards
                                          4. Anis Magic Fingers

Condition number 3 ----> DONE!

Condition number 4 ----> 7 things about myself:  DONE!
                                      
                                         1. Love comedies....shows that makes me laugh.
                                         2. I love to sing and hum songs when I am crafting.
                                         3. My favourite color is BLUE.
                                         4. Love to cycle in the morning.
                                         5. Addicted to chocolate drinks.
                                         6. I enjoy doing random act of kindness.
                                         7. I smile a lot.....even if there isn't a reason for smiling. :)

OK! All done! heheheheh! That was fun! LOL! ;)

Pop up princess....

HB074

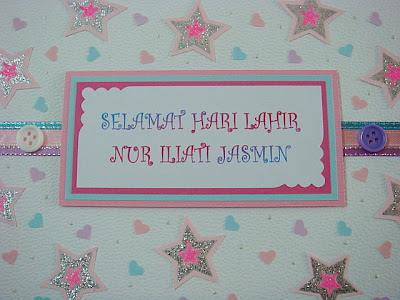
A princess theme card for a little girl.....who's birthday was celebrated last week. Her grandmother insisted that I made a pop up birthday card for her even though her birthday has already passed. I just winged it since I am not really that good at making cards for kids. I'm always blur blur one when it comes to this hehehe. So I did a little research and came up with this design. :)

I tried stamping this time. I have this star shape clear stamps......one big one, one small one. I stamped a silver color star on a pink paper and cut out the shape....then I added silver glitter glue on it. In the middle of it, there is a small star, so I added a pink glitter glue in it too. This makes it sparkle and shine when it hits the light :).I can't remember if I have ever done this color combination before but I kinda like it......it's sweet.....all soft colors of pink, purple and blue.....looks sweet to me :). 

The pop up inside was tough.......I had a hard time making the figure of the little girl. You see, the smaller the shape....the harder it gets to draw and cut out the shapes of the figure. To assemble the small body parts one by one is really tricky. It's hard working on small shapes.....but what can I do, in order to fit in the girl in a standing position, the figure has to be small in size. I really enjoy stamping the stars inside the card.....it's simple and fast. It's fun :).

Chủ Nhật, 2 tháng 5, 2010

May 2010 Blog Giveaway!!!


Hello my lovely readers! It is that time of the month again when I hold a monthly blog giveaway for my loyal readers :) For this month, since it is the month of May, month number 5......so that means there will be 5 lucky winners who will be chosen this time around. Those 5 lucky winners will be receiving each one a pop up card  just like the photo you see above. As you all know, recently I made a poll at my blog to find out and also to help me decide on what type of card that you would like to win for this month's blog giveaway. As the poll ended, it shows that the most wanted or most desired card by my lovely readers is the Love Theme Card!!! It's a clear winner!! So, this really helps me decide what card I should be making and giving away to you! Yup! I prefer to give something that you would love to have rather than give away something to you just for the sake of giving. :)

Prize for May 2010 Blog Giveaway:
LOVE THEME POP UP CARD (V023)
Size of card - 10.5cm x 21cm


Rules on how to participate in this blog giveaway is quite simple. Just follow the guidelines below to entitle yourself as a participant.


Here is how you can win this lovely card. You can earn an entry by following the simple steps below....

1. You must "FOLLOW" this blog / "BE A FOLLOWER" . If you are already a follower, then you can
    straight away follow the next step below.

2. Leave a comment on this post. You  must write a comment or give suggestions regards to my card blog.
    Be sure to also write your name and your valid/active email address at your comment.

3. You must write about this blog giveaway at your own respective blog and include the photo you see above
     in it as well. Then, link your post to this blog giveaway.  Add the URL link of your blog post in your
    comment so that I can go and visit and read your post at your respective blog.

Ok! Those are the simple things that you need to do in order to get an entry in this blog giveaway. Those who fail to follow will not be included in the lucky draw list. This giveaway ends on the 25th of May 2010 at 11.59pm. I'm giving more time and chance for more people to participate! So that's why I'm ending this giveaway on the last week of May. 5 lucky winners will be chosen by a lucky draw. The name of the winners will be announced on the 26th of May 2010......All the best of luck to all participants! Thank you!!! :)

XOXO,
Lin

I LOVE YOU...

V023

Inspired by my beaded bookmark collection, I began to try out new possibilities of using those plastic beads for my new card collection and this is another one that I came up with after having so much fun using them for my latest Mother's day card :). 

I also experimented with the clear stamps I received from my dear friend in USA (Sandi Staley), quite a while back. She sent me the "i love you" and the "slim heart shape" clear stamps. I've been keeping them safely for too long......hehehe.....there are lots more of the clear stamps  in my collection that I've never even tried. Been thinking a lot about how to use them to decorate my cards. It's a challenge for people like me who rarely use this technique to decorate my cards. I just couldn't quite decide where to stamp them hehehe. That has always been the problem. I'm getting used to it.....need to experiment more :) It's actually quite fun once you get the hang of it!

Oh! I forgot to mention that this is the first time after a long long time that I am coming up with a new shape of card. For quite sometime now I've only been using the half A4 size cards. Long time ago back in 2007, I've done the long slim card version but that one was too slim to fit in a lot of words when we write our wishes in it. So I thought perhaps I would make it a little wider for more space inside to write what's on our mind. Also, this gives me more space to decorate since it's a little wider. :)

The pop up inside is a big red heart shape that is partially decorated with tiny gold hearts that was punched out using my new heart shape craft punch. I'm having so much fun with it by the way hehehe.....:) Then I stamped the "sweetheart" words in the middle of it using another clear stamp. I'm thinking of giving this card away for the May 2010 Blog Giveaway......what do you guys think? OK or NOT???? hehehhee!!