Thứ Sáu, 30 tháng 4, 2010

Happy Mother's Day....

MD008
This is a Mother's day card that I made for my Mom hehehehe.....It's her favorite color.....peach and orange colors :). I was trying to hide it from her so that it would be a surprise for her on Mother's day but she caught me taking photos of it this morning! Acckkkk! So the surprise is gone now huhuhuhu......Maybe I will make another one for her soon heheheheh....

As you can see at the close up photo, I've decorated the front of the card with plastic beads. I love those beads. I have been using them for my beaded bookmarks. I have plenty of them available and thought of trying out this new technique.....I've thought about using the beads this way for the cards for quite sometime now but never had the chance to do it yet. So I thought this is the perfect time to do it. There is nothing that complicated about this design....it's quite simple really. But as usual it's always time consuming because I like to decorate a lot of things on it...hehehehe. And this time around I used a new craft punch I just bought a couple of days ago which is the tiny heart shape craft punch. I'm always a fan of the heart shape craft punch. It's super cute and it can be used for a variety of card designs, so it's definitely worth the buy :).

For the pop up inside the card, I tried again to use the weaving technique to weave the hearts sides by side. So I had to glue the hearts on strips of thick pink paper in order for it to stand up straight.  It's just like what I did to my flowers in my previous pop up cards. I didn't want it the strips of  paper to bend. So it's important to use a slightly thicker paper for this technique. I added the tiny flower sequins of various colors on the hearts. It's the same flower sequins I used to decorate the front of the card. I love the shine it gives when it hits the light :).

Some people feel that for Mother's day cards, we shouldn't put too many heart shapes.....instead we should use more of flower motifs. But for me, I feel it's ok to use a lot of it because it helps to show our Mother how much we love and care about them. :) 

Chủ Nhật, 25 tháng 4, 2010

Please vote for my May 2010 Blog Giveaway!!

Hello everyone!

I made a poll recently to see which card type you would prefer to win for my May 2010 Blog Giveaway. I placed the poll right beside the blog posts.....it's at the top part of the blog on the right. Can  you see it?? :)

You see....I had a hard time deciding what type of card to giveaway next month. huhuhuhu.....funny huh?? SERIOUSLY......I am lost for ideas here. So I need your assistance in helping me decide what card type that you most desire to win. For example, if the poll results show that "Happy Birthday card" is the most desired one, then I will prepare 5 birthday pop up cards for 5 lucky winners! At least this way, I can tell what  type of card you guys really really want. 

Well, this is just one of the ways of  helping me decide. If you guys have any other suggestions, do let me know ya! Write your comments here so that I can find out what type of card you most desire to get. If it is something that I can do for you, then I will give it my best shot. :) 

So please VOTE VOTE VOTE at my poll here or write comments at this post for your suggestions. I really do appreciate your help! Thank you again everyone!! Take care and have a lovely day ahead!

XOXO,
Lin

Thứ Bảy, 24 tháng 4, 2010

Selamat Hari Lahir Nurdini Atikah....

HB073

I think by far, this is the most colorful card I've ever made hehehehe.... :). It's for a 9 year old kid....Nurdini Atikah. This design was something that I wanted to try out and at first I did something that was a little different at the top of the card, then I took them out and replaced it with those foam confetti. I love those....it has that raised effect. I just randomly arranged all the square gift boxes at the bottom of the card and place colorful metallic strings on it that I've formed into a ribbon shape.

I was not sure of what kind of pop up I would do on the inside of the card.....then I thought of doing a pop up of the birthday girl herself. Although I've never seen her before, I just randomly chose to do her in this attire and with that shape of  face. It was done spontaneously. I just did whatever came to mind. All I thought was, I wanted it to be something different and different it was indeed. :)

Thứ Năm, 22 tháng 4, 2010

Closed for commissions in month of May & June 2010...

Hello my lovely readers! Good day!

I have a really important announcement to make to all who are interested in ordering my handmade cards in May & June 2010.....I'm so sorry to announce that I have to stop taking orders for at least 2 months because at the moment my hands are already full. I have so many pending orders to finish up during my leave.
Another reason why I'm making this announcement is so that whoever has interests in ordering cards from me can make plans in advance. So if you need my handmade cards starting from the month of July please book/confirm your order earlier to ensure getting your cards at the time that you wished for. If you book your order now, you would probably receive your order a lot later. Which means you would have to wait and be in the waiting list. I make the cards based on first come first serve. I do not have anyone to help me out with the card making and managing my business. It's a one man show. So I do hope you would be so kind to understand and consider my situation at hand.

I also would like to inform that I do not make card samples for my customers......this is regarding custom made cards.....I do not have the time or budget to make samples for everyone. Making the card itself, especially custom made cards are so time consuming......and time is so limited these days. Plus, to make the card samples that includes personalized wordings on it is not good for me because if you don't like the samples, then I can't use that card anymore because if it has someone's name of it. In other words, I lose time and money there. When ordering, all you need to do is inform me your color of choice, size of card you prefer, provide me the wordings of your choice, what type of theme you prefer, and whatever you wish for to have on that card, when you want it.......just email me the details......then we can work out on a design that you would love. Please do not SMS me when you wish to discuss on the design. I would prefer that you email me or YM me (if I'm online) whenever you would like to discuss on the design. Once the design is confirmed, then payment must be done before I start making the card for you. I'm so sorry that I have to mention all this here, but I think it's necessary to inform, because I do get a lot of inquiries regarding this matter and I feel that it's best that I mentioned it here so that everybody else can benefit from this information.

To those who have confirmed their orders with me and have made your payments, please do not worry, I shall  be completing your orders as planned. Thank you so much for your kind patience and understanding. :)

XOXO,
Lin

Thứ Tư, 21 tháng 4, 2010

Thank you so much Mas!

TY004

How sweet is this sweet color combo?? I love the sweet soft pastel colors here. I was requested to do a thank you card for the same customer who ordered the Chelsea FC card. This card is for her dear friend Mas. I was the one who suggested a pop up inside but at the time I had no idea what to do yet....hehehehehe.....I only had the idea of doing it as sweet looking as possible....cute, adorable like what my customer wanted. Something with soft pastel colors and feminine looking.

I realized that after so many times making a handmade card that is quite big in size, now I find making a card that is small quite in size quite difficult to do...hehehe....funny huh??? Well, that's how I felt when I made this card....I felt like there is not much room for decoration.....and it was quite difficult to make a pop up inside....especially a pop up like the one above. Perhaps for small cards like this, it's better to make simpler pop ups. Hmmm.....it's a lesson learned for me this time. I guess I was too adventurous in trying. ;P

But all in all I love this sweet looking card no matter what......I am so in love with the colors.....I would love to have a blouse with these colors on them.....so girlish hehehe......so like me!!! :D

Chelsea FC themed birthday card!

HB072

Phew! Made it just in time today to finish a couple of cards for a customer.....she's been waiting for her orders for quite sometime now....huhuhuhu......I was thinking that I could get them done by tomorrow and post them tomorrow instead but since she will be on leave soon, so by hook or by crook I had to get them done today and get them posted. I was worried like God knows what.....coz I was so afraid if I couldn't make it on time for delivery. Luckily for me, God was on my side and I remained calm throughout the whole process and managed to deliver the cards just in time before the post office closes at 5 pm....phew! Thank God!!

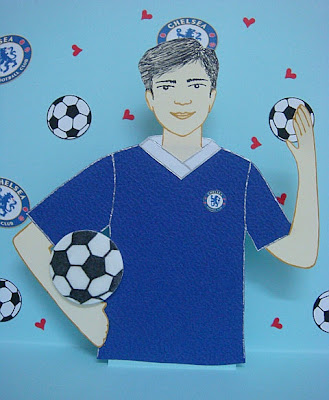
Ok! Now lets talk about the design.......this design was a request from my customer for her BF's birthday. She wanted the birthday card to have a Chelsea FC theme and with a pop up of her BF inside......color combination of choice was BLUE and WHITE. But I added some red, silver and black to it and a tiny dash of gold  coz those colors exist in the Chelsea FC logo, except for black and silver of course.  I tried my level best to make sure that blue and white was the major color for the card.....so the rest of the colors were there to enhance it. 

She emailed me a few photos of her BF so that I can use it as a reference for me to do a cartoon character of her BF. I tried my best to make it look as similar as I possibly can. :) I suggested to her that I do her BF wearing a Chelsea FC jersey.....because then it would be more interesting hehehe.....well, I guess it would suit the theme if he wore it in my opinion. ;) I even printed out a teeny weeny Chelsea FC logo and glued it to his blue jersey....can you see it???? hehehehe! I thought that was cute! I just wanted it to look as close as I can to a Chelsea jersey ...so that's why I did that. I even made the soccer ball from white foam and drew the pattern on it to make it look like a soccer ball hehehe.....love that one. I tried to make it look like he was holding the ball close to his body with his arm wrapped around it. Gosh that was hard to do.....I'm still learning about the human anatomy hahahaha......it's pretty hard for me to draw it coz I'm still in the learning process. Hopefully in time I'll be better at this. :)


Thứ Ba, 20 tháng 4, 2010

Thank U to a #1 Teacher

TD009

I wanted to share with everyone one of my Teachers' Day cards today. It's a design I made just a little while back but never published it here before. It was an order I made for a customer. I made two for her but she only bought one. This particular design is not that big....it's just a 13cm x 18cm size card. No pop ups.....just decoration on the outside. 

The words THANK U was done using the alphabet rubber stamps, the big size ones. Stamped it one by one and layered it with another paper. It's just a lot of work....hehehe.....well, I guess most handmade cards does require a lot of time making them. That's why they cost more. It's just time consuming. :) 

I do have plans to make more Teachers' Day cards this year.....but, hmmmm....when when when.....when will I do it....huhuhuhuhu......so many things to do...yet so little time. But I'll give it my best shot this year. We will see how it goes! ;)

Chủ Nhật, 18 tháng 4, 2010

Dedicated to Inspector Papa...


HB071

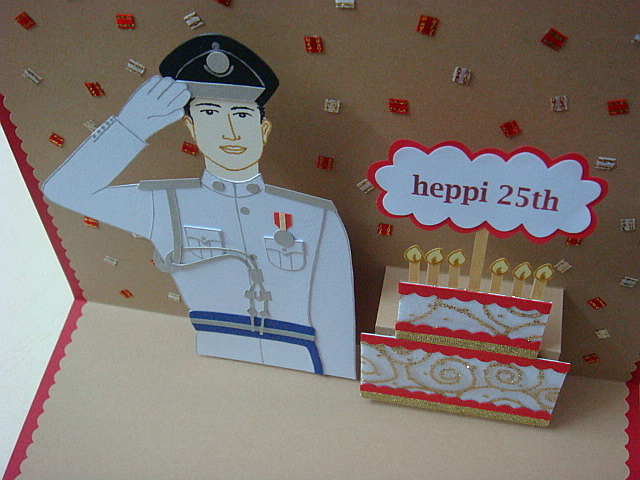
It's done! I can't believe I managed to get this order done in the end! It was a tough one! I am feeling a bit sad because I have to post it today to my customer and I just don't want to part with it! LOL! This card was a request from my customer whose fiance' is an inspector. It's his birthday today! Happy Birthday Inspector!! hehehe! Unfortunately he will be getting this card only by tomorrow....yeah, a little bit late....just a little! ;)

My customer was the one who requested me to do a cartoon of her holding a pistol.....I quickly thought of James Bond! So that's why I did the silencer hehehe......kinda cool though if I did that one instead of the usual pistol hehe! I asked for her photo and also a photo of her fiance'.....and she wanted me to do a cartoon of her fiance' wearing that uniform.... Love it! So, I made it look exactly like the one in the photo she gave me.

It was really tough thinking about the color combination too.....it took me quite a long time to figure it out. The layout is not as great as I want it to be.....but at the moment that is all I can think of.....I wish I knew some other better layouts but....sigh..... :( . The pop up inside was done as simple as can be.....coz time was running out and I thought this is the best way I know how. She specifically requested the cake to have the wording on it.....but I try to add the candles anyway.......luckily it was possible to do that.....coz I didn't want it to look like a wedding cake. So the candles had to be there no matter what! hehehe! I do love the coffee color paper on the background though.....it really looks good with dark red. Love that combination! ;)


Quilling


I've wanted to do this and add this quilling technique into my card collection for a long time already. I've done this technique before....yup.....long long time ago in a galaxy far far away hahahaha.......which means, I haven't done this technique in quite a long time. Back then when I first started learning how to make cards, I didn't even have the proper tools to do it. I just rolled up the strips of paper and formed it into different quilling shapes.

Last couple of months ago when I made a trip to Kuala Lumpur, I went to search for craft tools and stumbled upon this quilling tool set at Scrapbook Memories in One Utama, Damansara. You should have looked at my reaction when I first saw it! I almost jumped up with joy! Tried to contain myself from screaming and doing the dance of joy! hahaha! I never thought I would find it there. I thought I might have to order them online someday......never occurred to me that it would be available in Kuala Lumpur. How ignorant of me! huhuhuhuhu.......oh well....at least I got it at last!

But till now I have not yet made any designs from it.....huhuhuhu......the flowers you see at the photo above is the only thing I've done so far. Sigh.... :I.  I've been so busy, that I don't have time to try out this new technique. I need to study how to do it as well......thank God for the online tutorials!! Yup, there are lots of them online....at Youtube and other websites. Just Google and you'll get a lot of websites that gives a lot of great step by step instructions on how to start quilling.

One thing though that I realised.....without that small little tool......you'll find it hard to do it....yes indeed. Coz I've tried doing it before without the tool and it was so slow! This tool definitely helps making it fast and easy. If you wanna know more about quilling....check out the websites below. There is a whole bunch of great infos there for us to start quilling. :)


Below is a slotted quilling tool that I am currently selling at my blog:

SLOTTED QUILLING TOOL
BRASS NEEDLE SLOT WITH PLASTIC BLUE MARBLE PATTERN HANDLE
SIZE OF TOOL IS ABOUT 12CM IN LENGTH


Just email me at inaabdul_21@yahoo.com if you wish to purchase this slotted paper quilling tool. Thank you! :)


Watch the video tutorials I made below on how to quill using the needle quilling tool and the slotted quilling tool :)


Thứ Sáu, 16 tháng 4, 2010

April 2010 Blog Giveaway Winners!!!!

Good afternoon to all of my lovely readers! At last I am done checking all the names of participants of the April 2010 Blog Giveaway and have randomly picked 4 lucky winners!! This time around, there were not many participants as last month. There were only 15 people who participated in this month's blog giveaway......hmmmm I wonder why....perhaps because they didn't like this month's prizes?? huhuhuhu, I donno....but I'll try to give something more "interesting" for everyone next month. Perhaps a pop up card next time around......I really would like to do that.... :) There will be 5 winners next month....so, looks like more and more people have more chances of winning something from Lin Handmade Greeting Cards soon! :)

Ok! I am so happy to announce the names of the winners for my April 2010 Blog Giveaway. Check them out below:

Mama Zharfan 
http://suzie284.blogspot.com/
.
.
Mamalyna
http://ejanblog.blogspot.com/
.
.
Zai kulim
http://zaikulim.blogspot.com/
.
.
Nea Flerida
http://neaflerida.blogspot.com/


CONGRATULATIONS TO ALL OF YOU!!!! Please email me  as soon as possible your full name and complete mailing address plus your active contact number for mailing purposes. I will post the prizes to you on next week! 

Heartfelt thanks to all who have participated in my April 2010 Blog Giveaway. I really appreciate your effort and all your lovely wishes......I'm overwhelmed by them! Thank you so so much! For those who did not win this month, do try again next month for more interesting prizes to win!

XOXO,
Lin

Thứ Năm, 15 tháng 4, 2010

Selamat Hari Lahir Mohd Ibrahim...

HB070

Does this design look familiar to you??? hehehehe! Well! Of course it does because I've just made one the other day that had a similar layout as this one except that the background of the card was black. This card is made for my Mom's friend. She ordered this for her husband's birthday. The background  color of this card is metallic bronze. Looks like this color suits the same colors of the heart shapes I made for the black card. I wanted red and white heart shapes to be mixed with dark brown instead but the dark brown paper I had was not as pretty as this one so I choose to do it with this metallic bronze paper instead.

I suppose the most obvious difference in this design is the pop up I made inside the card. I made some changes with the pop up this time. I'm always trying to make it different. But after it was done I realized that the big hearts I pasted on the side of the birthday cake kinda look like it had wings attached to it!! Me and my imagination! LOL! The birthday cake looks like it's going to fly! LOL! The heart shapes were cut freehand by the way.......I just cut them up using my faithful old scissors and carefully arrange them side by side......and made smaller ones and scatter them at the back. Those shiny confetti looking thing scattered together with the hearts are actually made of ribbons that I cut up piece by piece. I really hope she likes it! :)

Thứ Hai, 12 tháng 4, 2010

My heart belongs to you.....

HB069

Yes! It's done! Finally! I'm loving it too! I received a request to do a design similar to V021 but was also given the permission to make some changes here and there to make it different. And so I did some changes  in the layout and I added something to it that is similar to another one of my card designs I did before.  Which is adding the foam hearts with glitters on it. A lot of mix and match here I must say hehehe.  I made it look like as if all the hearts are trapped in boxes hehehe.....can you see it?? ;)

This design was pretty time consuming, but fun to make....as usual all my card designs takes a lot of my time to make.....and since I work very slow, it's even more time consuming hahaha! All the hearts were cut by hand....each and every one of it....even the tiny ones in between the bigger ones. No craft punch was used for this particular design. Oh! Except for the teeny weeny white hearts on the envelope! That one I used a  heart shape craft punch! hahaha!

For the pop up, I was given the choice of either doing a pop up like the one in V021 or in HB055 and I decided to do something like the one in HB055. Still, I made some changes to it. Always trying to make it look different.....just some little changes though....not that much :). I made it look like the 2 tier birthday cake was sitting on the gift boxes....surrounded by them! :) 

What I like most about this type of design is that I can change the color combination if someone where to request it so. It's easy to change it unlike other designs. It is always a good challenge though if it was difficult to do so but I don't mind if I get to do something easy once in a while :).

Thứ Sáu, 9 tháng 4, 2010

Bridal gown

W012b


W012a


I haven't been making wedding bridal gown cards for quite some time now. I have been getting quite a number of requests from customers who are interested in this design for their wedding. But at the moment I am just not able to do them because I don't have enough time to do bulk orders for one particular customer. So I just prefer to do wedding cards that are meant to be given to brides and congratulate them on their wedding. :)

The material I used to make the bridal gown is doily paper. There are a lot of types of doily paper in the market. I found this new pattern which I quite like and have made a wedding gown out of it recently for one of my wedding card designs. So now I'm using the same one to make a bridal gown for this small wedding card. As you can see, the shape of the gown is similar to my old wedding card designs, the only difference is the pattern of the doily paper. Another difference is that I layered the wedding gown with a white organza to get that shiny effect. Usually I would layer it with metallic silver or gold paper. I wrote the wordings at the side of the wedding gown "happily ever after" as a wish for the lucky bride :). It's handwritten using a gold metallic pen. Love that! 


Happy 31st Anniversary....

AC001a

I was requested to do this design which is the exact same design as AC001 except that I was asked to change the wordings a bit. The wordings at the outside was changed to "Happy 31st Anniversary" because this card was intended to be given to another couple's anniversary. I was also asked to put their names together with the wordings but I thought that it would be too crowded to have them all together like that so I separated the wordings to be half outside and the other half inside. So their names were placed at the two big heart shape pop ups inside the card as you can see at the photo above. In my previous anniversary card design, at those two big hearts, I would usually write the dates of their anniversary. So this time I did something different by placing their names instead. And I love it that way :)

Thứ Năm, 8 tháng 4, 2010

April 2010 Blog Giveaway!!!


Hello again my lovely readers!! It has finally come again for the 4th time this year.......it's my April 2010 Blog Giveaway!!!! Yes!! :D Sorry it took longer than usual to do this blog giveaway this month.  It was suppose to be on the 1st of every month.....but since I have been so busy for the past few weeks....didn't have the time to do the giveaway at that time. Right now I have some little time away from work so I get to work on this giveaway today. :)
This time around, I'm giving away prizes for four lucky winners. I've decided to giveaway two lovely cute wedding cards this time around for each of the four winners. This is a new design and never been sold before. Have a look at the wedding dress, I am using a new doily pattern since the old ones are no longer in stock.

Here is how you can win these lovely cards. The rules are the same as the one I did previously . I will give one entry for participants who blog about my giveaway in their respective blogs. You can earn an entry by following the simple steps below....

1.You must "FOLLOW" this blog / "BE A FOLLOWER" and leave a comment on this post. You  must  write a comment or give suggestions regards to my card blog. Be sure to also write your name and your valid email address at your comment. Then you must blog and link about this giveaway at your blog, and link your post at your comment too.

All the best of luck to all participants! This giveaway ends on the 16th of April 2010 at 11.59pm. A winner will be chosen by a lucky draw. The name of the winner will be announced on the 17th of April 2010......Thank you!!! :)))))


XOXO
Lin

Thứ Ba, 6 tháng 4, 2010

King for a day!


HB068

This is a treat to do! Another new theme in my collection :). Medieval King theme. It was inspired by the birthday wish that my customer wanted me to print inside the card. She gave me the wordings that was about her brother being King for a day on his birthday. The wordings were really nice! So I thought, why not have the subject matter be connected to the wordings? Wouldn't that be nice and something new. So after she agreed with my suggestion, I also asked for her brother's photo so that it would look similar to him. Well, I tried my level best......I think the lips resembles the real person hihihihi..... :)

I also did a pop up cake.....vertically instead of doing it horizontally. This is a first for me to do it vertically like that. So since the pop up square is flat, I can't make the cake look like the usual pop up  3 tier birthday cake I usually make. Hence the candles can only be placed at the top of the tier instead of placing them on each tier. I would have done the usual 3 tier pop up birthday cake but since I had to put the wordings at the side, I was not able to do the usual pop up cake. If the wordings were little, probably I could. But this one was quite a lot and required a lot of space. I also decorated the cake with a lot of gold glitter glue. Lots of it.....so the cake looks so sparkly and shiny! hihhihihi! Love that effect!

Pop up wedding cake....

W011

I am super excited about this design.....it is a request from my customer to make a wedding card for her brother who will be getting married soon. Honestly, I didn't have an idea of how to do the design until yesterday the idea popped up in my head. hehehehe.....My customer decided on the color combination earlier on....she wanted it to be in black and white. But I added silver, gold and grey in it as well.

I've always wanted to use the doily to make a wedding gown like this. So finally I get to do it today. It's also a first time for me to do a groom together with the bride.....usually I would only do a wedding gown using doily paper. I guess it was easier that way. :) But now I've tried something that is new to me. Ever since I've been doing a lot of figure drawing for my card designs, I've less fear of doing it. So, I hope to be better at this as I go along. After all it does take a lot of practice and practice to be good at something. :)

This is also the first time for me to do a wedding cake. I've been doing a lot of birthday cakes but no wedding cakes before. So for a wedding cake I have no need to put any candles on it at all....I decided that I wanted to decorate it using a glittered organza. Wrapped it around the cake and then decorate it with ribbons and heart shape paper. It was easy to do. :) A simple square pop up.