Hiển thị các bài đăng có nhãn Thread. Hiển thị tất cả bài đăng

Thứ Bảy, 30 tháng 5, 2015

3 tier pop up birthday cake card

HB124

Just recently I made a handmade birthday card for a good friend of mine whom I've known for many years. We were room mates when we were studying in ITM. I had wanted to do this for her for quite a while now. Planning and planning but the plan didn't work out as it should and in the end I had to post the card to her instead of giving it to her by hand. I guess God had something else planned for me on that day. I'll just have to make another plan! haha! :D What matters is that she loved the card so much and that really is all I could ask for. To make her happy even if it was just for a day :).


OK! Back to the card! I came across some really nice DIY pop ups at a stationery store recently and I was really excited about it since I love pop ups so much. I never knew they sell these things! I've never seen them before. So you can surely imagine my excitement. Hahaha! Unfortunately, the choices that they had were quite limited. I wish they had more.

Usually I would make the pop ups myself from scratch but I thought it would be nice to once in a while use a ready made one instead for my handmade cards. It's so convenient especially if you are in a hurry to get a card done for someone's birthday. You can also add some personal touch to it if you like to make it different from the original design. But if not, you can just use it as it is.

It was not that difficult to fit the pop up birthday cake in my handmade card as I am quite familiar with the mechanics of the pop up. So it was easy peasy for me. Besides, they do have some photos in the package that explains how to fit the pop up inside the card. 

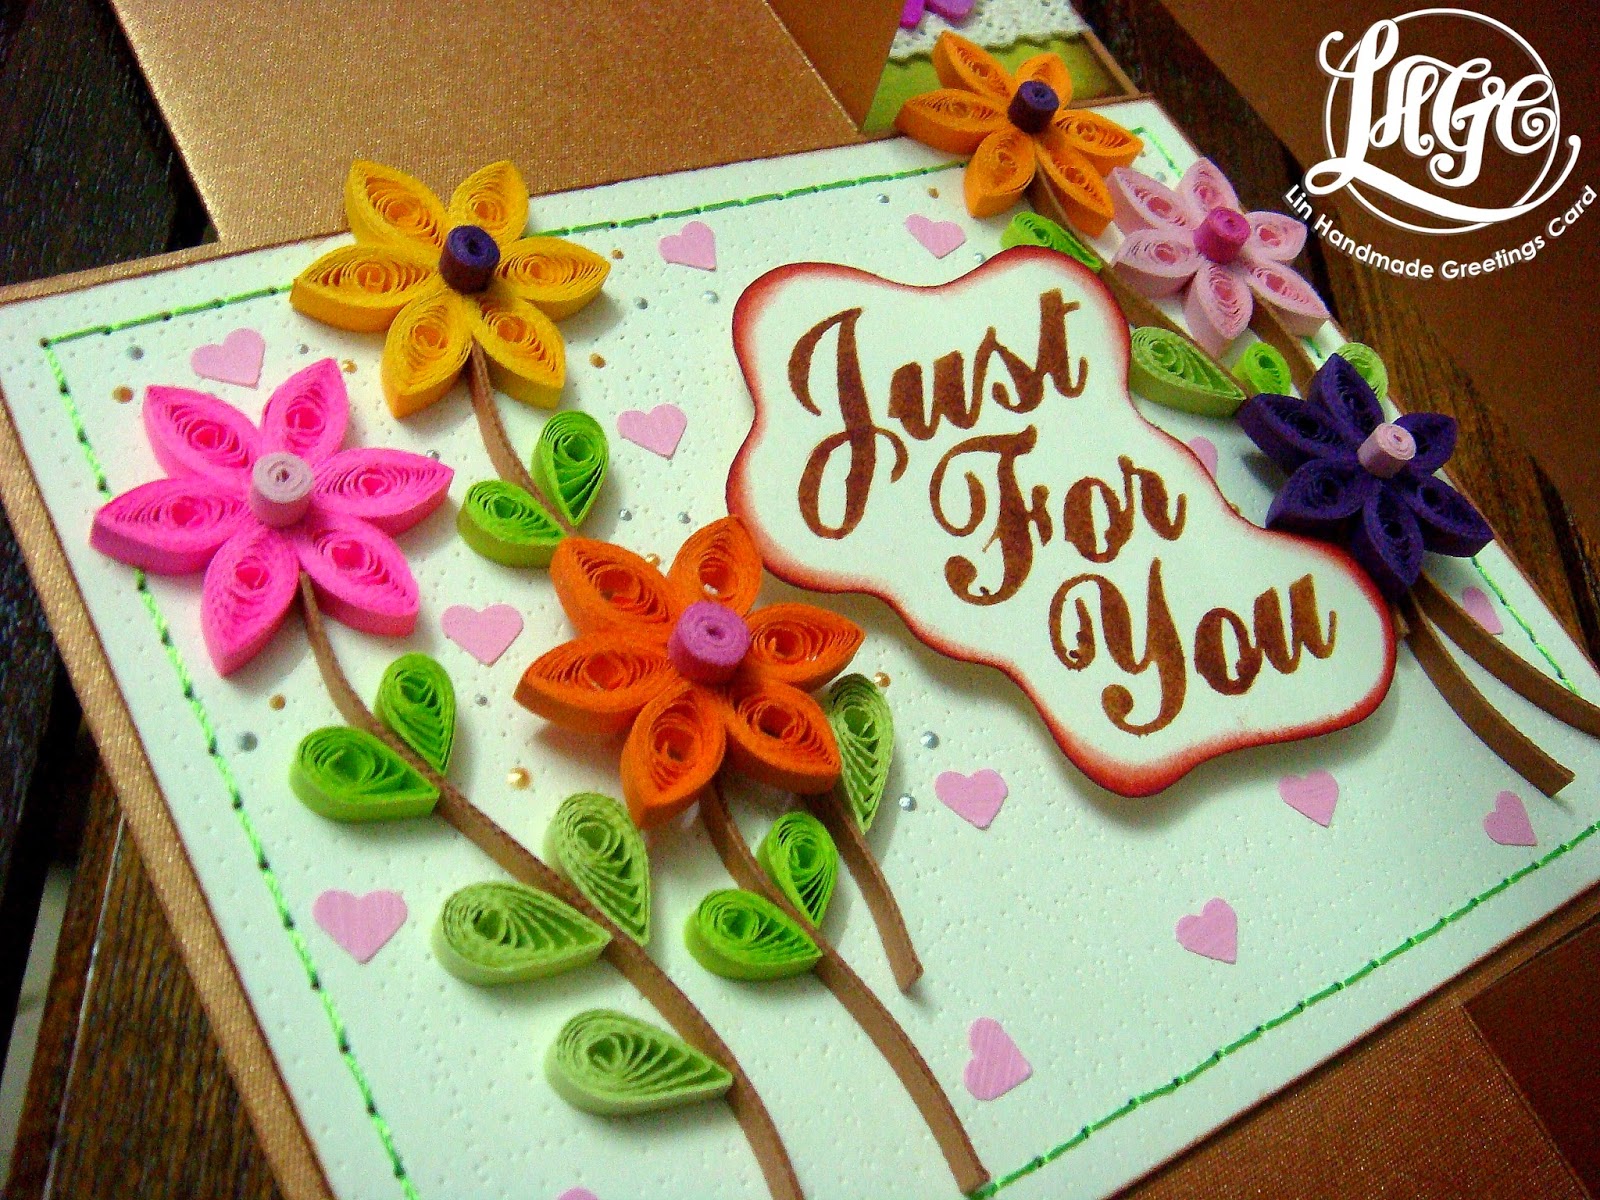
I also did something I've never done before with quilling flowers. A difference in technique in this case. Usually when I add more than one colour to each petal, it's mostly done using the combing technique.....but for this one I used the slotted quilling tool instead. Perhaps I should consider making a tutorial on how to get that effect on quilling flowers and leaves. If there is a demand for it....or not....I just have to find the time to do it. :)

Another different thing I did was sewing all around the decoration with multicoloured embroidery threads. No cross-stitch this time....just plain straight line. That was really fun! It created a texture on the card and a colourful background that would match the decorations. The gold painted soft clay that was pressed with a birthday sentiment was something new for me to experiment on with what I can do with soft clay. It reminded me of what I used to do with real clay back when I was studying ceramics. Gosh I missed it all so much!

Do check out the pop up birthday cake at the video below and you'll be able to see how it pops up in the card. :)


Thứ Năm, 21 tháng 5, 2015

Seven flowers pop up birthday card

HB123

Way back in 2009, I made my first 7 flowers pop up. It was for a Chinese New Year card. I remembered how excited I was to see all the 7 flowers pop up each time I opened the card. I felt as giddy as a school girl. Back then, in my mind I thought that this pop up was the most difficult of all to make. But now I know, there are others types that are much much more difficult to make compared to this one.

There were little flowers and leaves added to the 7 flowers pop up to make it look like a bouquet of flowers. I didn't want to leave it plain and simple. I just had to add other things to the flowers to make it look more fancy. What do you think? Did it work? heheheheh!!!

I guess that this is the first time for me to use the Teary Loop flowers for my handmade card. I made a tutorial on how to make the flower long time ago and uploaded the video on YouTube, but never used them for any of my cards until now. In the tutorial, I made a small version of it, but for this card, I made the small and large version of it combined as a flower. I like the way it looks, either single or double.

The previous birthday card I made had cross-stitch on it too, where I used 4 different types of colour threads. In this one I only used two colours but had them stitched side by side. I love this idea and will probably use this idea for future cards. The cross-stitch took such a long time to sew on the paper but at the end of the day, the results made me so happy. 

Another thing I would like to mention here is the gold frame that I added to the card. I made it myself using a hard board. After cutting it up, I painted it with a gold colour to make it look fancy. I framed the washi tapes and patterned paper with this frame and decorated it with the flowers and sentiments. The rhinestones simply added some bling bling to it and made it look fancier than before. I just love how it all turned out.

This birthday card was made for someone who is very dear to me. I really hope she likes it. I know that she looks forward to receiving my handmade cards every year, but I sometimes don't have the time to make one for her. I'm so happy that this year, I can. Hey, even handmade card designers have problem sending cards to their loved ones, I kid you not! Hahaha!!

Do check out the video of the card below so you can view how to flowers pop up inside the card. Enjoy!

Thứ Sáu, 1 tháng 5, 2015

Double star loop flower pop up birthday card

 HB122

The pop up craze and cross-stitch continues. Not to mention the washi tapes and soft clay too. I guess, you'll be seeing those things a lot in my future designs.....well at least for the next few weeks until I get a little bored using them for my handmade cards. Hehehehehe!!

I've been making a lot of the smaller size cards lately and for today I wanted to share a bigger one for a change. It's not that big though, just half the size of an A4 paper. I started with sewing the cross-stitch all around the edge of the card to form a frame for the decorations. I used 4 different types of red colour embroidery threads. I love the effect it gives compared to using just one type of colour.

The polka dots washi tapes was then lined up with the patterned papers, birthday sentiment, quilled flowers and leaves, and lastly touched up with the rhinestones. I made those double star loop flowers long time ago. But only now do I use them for my design. The flower itself is so tedious to make. Takes such a long time to complete one flower. I guess that's why I never used them before. I do have a tutorial on how to make them if you are interested to try. Check out the video below:


I've always wanted to make this type of pop up technique for my cards. It's not that difficult to make either. I like it a lot because I can paste so many flowers together and not worry about any of them bumping into each other whenever the card opens and closes. Basically, you can use all sorts of subjects to pop up with this technique. I'll definitely make more of this type of pop up in future now that I know how to do it. :) Do check out the video of the completed card at the video below and see how the pop up flowers spread open like a fan when the card opens up. Hope you all like it! :) Enjoy!

Thứ Ba, 28 tháng 4, 2015

Cross-stitch heart pop up card

V066

The cross-stitch craze continues with this little love themed pop up card. I just had to do it. I saw the other day on the net some photos of a cross-stitch heart. It was so attractive to me, I was dying to try it out. And so I did! A small one for the small card.

It was not that difficult to do. The only thing I felt difficult to do was the cross-stitch frame on the card. The size was so tiny compared to the one I did previously. I had a hard time punching out the holes and then sewing them, very tiresome to sew so many around the card. Although they looked really cute, I still prefer the previous size, which is much easier and faster to sew.

The pop up inside the card was the most challenging as it was the first time for me to make a pop up heart way up on top of the card like that. Usually the pop up hearts I've made before didn't require me to use a bigger paper insert for the card. This one did. It was the only way to create that pop at the top. It's difficult for me to explain it here. I guess, I'm talking Japanese with you.....but the point is, it was tricky at first, but once I have figured it out.....it's a breeze!

I wrote the sentiments inside the card. Just a simple one, straight to the point. I just wanted to try out as many different types of pop ups this year....especially the ones I've never done before. Combining a couple of types in one card or just one type it doesn't matter as long as I do it differently each time.

Do check out the video I took of the card below. You'll be able to see how the heart pops up at the top several times. I was just a little excited about the whole thing, so much so that I opened and closed it again and again. Hahaha! :D


Thứ Bảy, 25 tháng 4, 2015

LOVE pop up card

V065

Tried something different this time around.....as usual, I always try to do something I've never done before and for this card I tried to do cross-stitch. Did a simple one first, sew a simple frame on the card. Usually I would just sew a simple straight line whenever I wanted to make a frame on my card.....so, instead of doing that, I thought doing cross-stitch would be nice for a change.


I am familiar with cross-stitch as I've done it before when I was in primary school. It was a compulsory thing that we girls had to do back then. I was quite fond of it but it was an expensive hobby. The thread and the cloth was not cheap to buy. Since I'm interested in using this technique on my cards, I thought why not just do it on paper instead. I have tons of it just waiting to be sewn hehehehe! There's plenty of designs of cross-stitch that I would love to try out on paper. Like simple letters, shapes of hearts, flowers etc. As long as it's simple, I would love to try them!

The big soft clay heart was made using a silicone mold I got last year. I love the pattern and I thought it would be nice to use it on one of my cards. Since it's not a flat shape....it's 3D....so it's kinda bulky and I personally think, if I were to use it myself, I wouldn't post it.....I would give it to someone by hand. Unless I have a special box  and wrap it well to protect it from getting damaged during delivery.

The pop-up hearts was really fun to make. Not that difficult to make either. But of course it does consume a lot of time to do it. That's always the case when it comes to making pop-ups. It always takes time to get it done. But I love the outcome.

The card is a small one.....somehow lately I am enjoying making small cute cards for personal use. It's a lot faster to get done than bigger ones. Thus producing more as a result. Do check out the video below and see how the pop-up hearts sways and moves inside :).


Thứ Tư, 22 tháng 4, 2015

More bling bling!

HB121

I was just looking at the gold theme pop up birthday card earlier today and thought to myself......what if I added more bling bling to the card? I have bigger clear coloured rhinestones in my collection that would match the smaller ones and so I started adding them on the washi tapes and thought, hmmmmmmm......not bad! I thought it looked better than before. That's just my personal opinion. :)

Somehow the combination of the big and small rhinestones seems perfect together to me. I wish I had black ones or gold coloured ones.....but since there wasn't any at the store, so the clear ones seems fine here. I just had to blog about it and share the latest look of the card. Because now all of them look like this.....can't help it, I just had to add more bling bling! hahaha! :D

As for the pop up inside the card, it remains the same like the original one. No new additions or changes to it so far. Perhaps I might come up with a new one someday, who knows.  :)


Thứ Bảy, 18 tháng 4, 2015

Gold theme pop up birthday card

HB121

Ok, I have to admit, I'm a bit far behind when it comes to using washi tapes on any of my craft work. I bought a few washi tapes last year but never played with any of them at all till now. I must say it was fun playing with them now. Finally. 

I just tried the simplest way to use them which is by cutting them at the ends like we do for ribbons and simply paste them on the card side by side next to some matching pattern papers. I sew all the sides of the gold coloured paper too with a black thread which was another fun thing I love to do. I love sewing thread on paper.... if it suits the card, then I would do it.

Another fun and new thing that I tried this year is adding soft clay as decorations on my cards. It was tough figuring out how to do that but in the end, after a lot of research, I finally got it. At the moment, I experimented a lot on making soft clay decorations that were made by using molds. I had a few free molds from a company from China last year. And some of which I bought from the local stores. I just loved the outcome of it. And the endless possibilities of ways to use them. I just can't wait to use more of them in future. From a far, the soft clay looked like metal, but it's not. I just love the gold effect that somehow hides the fact that it's just soft clay.

Pop ups.....how I miss making them. I want to experiment more on it this year. More pop ups, more fun! It's just a small card and yet, I still wanted to add that pop up inside. I love the idea of adding a surprise inside each card. I made a few ready stocks of the card in case anyone is interested. If not, I'm dying to use them myself. Got a lot of birthdays coming soon! :) Do enjoy the video below!

Thứ Ba, 20 tháng 1, 2015

Love themed birthday swing card

HB119

Another swing card design for this month. It's a birthday card this time. A lot of dark red and green combination with this one. In fact I think there's quite a lot of red going on here! hehe!

I wanted to use the big wooden flower bead that I got last year as the focal point of the card. The one and only stock I have! haha! I guess this card is a combination of a lot of things that are limited in my collection. Some were given....some were bought. The ones that were given, was kept for quite a while with me because I adored them too much to use them..... But I can't keep them with me for too long ....I have to use them some day right? Otherwise, there will be too many craft stock inside my room and very little space left for me to do work there.

There were some parts of the card where I applied some molding paste. Flower patterns this time around seemed suitable since there are a lot of flower designs on the pattern paper itself. I enjoyed decorating the card using molding paste although it is quite a messy type of craft. But seeing the pattern formed on the paper somehow thrills me :D. Textures gives the card a different feeling. Hence, more molding paste artwork projects coming this year.

Played with a couple of clear stamps that I bought from Popular Bookstore. They seem to sell a lot of new cool designs there now. Super cheap too! I couldn't resist buying them every time I visit the shop. In fact I just bought some new ones yesterday. Ooooppppps! There goes my budget this year!! LOL! They also sell a lot of pretty acid free pattern papers. Very affordable as well. I like that very much!! :D Hope it stays that way for a long time hahaha!

Thứ Ba, 6 tháng 1, 2015

Just for you on this new year :)


Hope it's not too late for me to wish a very Happy New Year to everyone!! How's the new year been for everybody so far? Really good I hope....at least for me it's been a good start. I want to do my best to focus on good health and enjoying life as it comes. Don't want to stress myself too much. Last year was a really stressful year for me. So for this year, hopefully, more fun will come my way :D.

It's been a while since I last posted a handmade card design on this blog. I kept posting too much of handmade books. So I'm excited today to share a new card design here for the first time this year. It's a simple swing card design with a simple quilling flower arrangement on the front cover.

I haven't been quilling that much last year. Just some small projects done on quilling because most of the time I would be spending on making quilling starter packs instead. So it was a little exciting to do the quilling flower arrangement even though it was a simple one.

I love the huge wooden button because the design on the button was perfect for the pattern paper I chose for the card. It was a perfect match! It's not always that you can find two patterns of different material that compliments each other really well. So I had to add that button to the card. :)

I really like the olive green colours and how it combines really well with brown and other warm colours of the pattern paper. It gives a warm fuzzy feeling to it. This card can be used as a birthday card or a card for any occasion for that matter. And quite suitable to be given to a girl or a lady :).

More cards coming soon in shaa Allah......:)