Thứ Sáu, 31 tháng 12, 2010

Heartfelt thank you... :)

Hello there my lovely readers :),

Today is the last day of 2010 and this will also be the last post in 2010 for Lin Handmade Greeting Cards. I would like to take this opportunity to say a heartfelt thank you to all my dear customers, my sweet fans from my Facebook Page and my loyal followers at this blog who have been supporting my work and giving me so much of help, motivation and encouragement throughout this year. You guys have been so great, I can't thank you enough for everything! Lin Handmade Greeting Cards has evolved and improved a lot for the past one year. I really appreciate it all very much! Truly! :) It's been a great year for Lin Handmade Greeting Cards. 

One of my ways of thanking everyone for their support was to hold a blog giveaway, one for each month of the year. This way I get to give something back to my fans/customers/followers. It's actually a part of my bucket list too. I'm so grateful that I've managed to realize one of my dreams! Yay! :))

Each month I gave away prizes in the form of handmade greeting cards that I designed and produced myself. The number of prizes were determined by the number of each month. Starting with January 2010, which was month number 1, therefore only 1 winner was selected......till now, which is month number 12, therefore there will be 12 winners to be selected to win 12 handmade cards. Initially I gave more than one prize per winner, but due to time constraint and budget constraint, I had to limit to just 1 prize per winner. So sad....I wish I could have given more. :(

As you all know, today is the last day of the blog giveaway. I can hardly believe it. It has finally come to an end. The giveaway ends tonight at 11.59pm. There is still time for everyone to participate. Please take note that, I won't be holding anymore  blog giveaways next year as I have other plans lined up for Lin Handmade Greeting Cards in 2011. There will be a different kind of way for me to give back to my supporters........and it's nothing like the blog giveaway at all. So, do take this one of a kind chance to receive a gift from me by entering the last blog giveaway. Click at the link HERE to enter it. :) Don't miss it!

It has been a great challenge for me to handle the giveaways alone and I'm happy that I was able to pull it off all by myself. They say that if there is a will, there will always be a way. :). I wish everyone all the very best for the new year......I'm hoping more good things will happen for all of us and also for Lin Handmade Greeting Cards. :) Do keep on supporting ya!! :)

Gonna miss 2010 a lot but I can't wait to meet 2011. hehe! Happy New Year 2011 everyone!!! Wooohoooo!! ;)

Love,
Lin

Thứ Năm, 30 tháng 12, 2010

Miyyah@Kertas first giveaway!!

* Photo above taken from Miyyah@Kertas blog

A giveaway!!! From Miyyah@Kertas!!! Woohoo! I've been waiting for Miyyah to do a giveaway for quite sometime now hehehe! I thought I should try my luck even though I know it's not going to be easy for me to win it. I've been holding giveaways for one whole year at my own blog so I thought to myself.......part of my new year resolution is to join as many giveaways as I can for a change! haha! And this is a start! ;).

Just look at that beautiful photo album she decorated with those quilled decorations. So beautiful! :) She said that the photo album she's giving away won't be the exact same design though.......but something that looks similar to the photo above. Plus, the quilling strips she is using for this particular design will be 1mm in size instead of the usual 3mm paper strips. So that would be really nice to see! Can't wait! :)

It's a pretty easy giveaway to join as well......so why not? I'm already a loyal follower, and have been admiring her work ever since I found out about her blog in 2009 if I'm not mistaken. Just looking at her blog for the first time inspired me so much to do quilling. I didn't have anyone to teach me how to do quilling in the beginning so I studied her blog in and out! haha! Initially, her tutorials helped me understand what quilling is all about and I first knew about the mini paper shredder from her blog as well. I never knew such a machine existed if it was not for her...haha! I mean, I know about paper shredders before.....but a "MINI" paper shredder??? Who knew! hehe! The mini paper shredder really helped me a lot with my quilling adventures. I just can't quill without it now! :D

So, if you love quilling crafts like I do, come and join Miyyah's first giveaway now! :) Click at the link HERE :) and post your entry at her giveaway post. Wish me luck!! hehe!


Thứ Ba, 28 tháng 12, 2010

Storage ideas


During my trip to KL recently, I was asked by my fellow craft friends about how I store my craft materials especially my ribbons, buttons, beads, sequins etc etc. They are even interested to see what my studio looks like hehe!  Honestly I'm quite embarrassed to post photos of my studio here in my blog for all to see. Especially since it's just an old room that looks more like a store room to me! hehe! I love calling it my "studio" because it's where I work. Nothing fancy about it at all. It's simple and full of stuff!! You can even find lots of old junks in here as well! haha! :D

So I won't be showing you the full view of my studio yet! ha! Sorry! Instead I'll just share with you today some tips on how I store my craft materials.......IN A CHEAP WAY! LOL! :D


The photo you see above is actually my collection of buttons. I keep them all in plastic containers. Do the plastic containers look familiar to you?? Yes, you guessed it right! It's a yogurt container! Well, most of them are!  haha! I recycled them to be used as containers to keep all my collection of buttons. I didn't have enough money to buy really fancy compartments for buttons so I've been keeping all my buttons in these containers for years now. I marked the containers with markers so that I know which color buttons are in which containers. This way, I won't get confused when trying to find the right color buttons. :)


OK! OK!  PLEASE DON'T LAUGH YA! ;) This is how I store all my beads and sequins. Some I keep in yogurt containers, some in cupcake containers, some in hotel's shampoo and conditioner containers, some in medicine containers, some in chocolate containers and the list goes on and on. As long as the containers are plastic or made of see through glass, I'll use them to keep my beads and sequins in them. :P The truth is finally out! hahahah! :D


This is a plastic container where I use to keep all my ribbons! Look familiar?? Yup, it's the same plastic container you get whenever you buy cookies! haha! I always keep them whenever I buy cookies, so that I can use them to store my ribbons. I have so many ribbons in my collection and it's difficult to keep them neatly in boxes or drawers, so this plastic container helps keep them arranged neatly inside my drawer. 


See how neatly they are arranged in my drawer? I can even stack more ribbons on top of it if I buy more ribbons in future, so this technique really saves space :). I don't like to keep my ribbons outside because I don't want them to get dusty over time. So to keep them in good condition, I prefer to store them inside closed drawers such as this. 

You can also use this plastic container to keep all your small craft punch and your rubber stamps too. :) If you don't have drawers, you can always buy those affordable clear, see through plastic containers or Tupperwares to keep your small craft items. It's cheap, and you can stack them on top of each other to save space. :) 

So you see.....I don't have fancy storage boxes or fancy containers to keep my craft materials. I just use whatever I can find at home to store them. As long as they are kept nicely and neatly in my studio, I'm fine with it hehe! I guess I'm being practical since I don't have much to spend.  What is important is what I can produce with what I have. ;)


Shredded paper strips


I've been getting a lot of inquiries from friends and fans of quilling regarding how I manage my shredded paper strips. Honestly when I first started quilling, I had ZERO idea on how to store the shredded paper strips. I used to dump it all in one big box.......all colors mixed into one big box. That was a really really bad idea.

Although it may seem easy to shred the papers and dump it all in one big container, however in the long run, the paper would get entangled with one another and it's difficult to pick them out from the box when they are mixed altogether like that. Especially when you wanna use a lot of one particular color at a time. It  becomes stressful for you to choose the paper strips when that happens.

One day, I saw a photo on my friend's blog that changed everything! In the photo, my friend Asma' showed how she arranged all her shredded paper strips and it looked so neat!! It was from that day onwards that I followed her idea. It made my quilling activities so much easier hehe! All you have to do is put all your quilling paper strips in one long plastic casing. One plastic casing for one type of color. This way, it's more organized. :). You can get the long plastic casing at any hypermarket like Tesco or Giant. It's pretty cheap too. :)

After putting them all in plastic casings, then you place them all in a mini dustbin like the one you see above. Ok, this is just a suggestion ya?  It's what I'm using for myself and I find it very convenient. But you can use any kind of tall container for the same purpose.


As you can see from the above photo, these are the paper strips that I get when I shred one piece of A4 paper. The big bunch of paper strips at the top of the photo are the paper strips that were shredded nicely from the mini paper shredder. The little bunch at the bottom of the photo are the rejected ones. Usually when I shred one piece of A4 paper using the mini paper shredder, I would only get about 50 - 53 pieces of paper strips each time I shred them. More or less. I usually don't throw away the rejected ones. I recycle them for other quilling projects. :)

I usually shred paper that are not too thick. They weigh about 80gsm - 120gsm per piece. If you shred paper that are thicker than that with your mini paper shredder, it might not be a good idea because it's not meant for heavy duty shredding...hehehe. The cutter from your mini paper shredder may not last long if you do so.

I hope what I share with you all here today can somehow give you an idea of how I manage my shredded paper strips and how you too can manage your own shredded paper strips and make quilling more enjoyable. Especially for those who are just beginning to try their hand at quilling. All the best to everyone! ;)


Thứ Hai, 27 tháng 12, 2010

Mini teddy bears


Thinking of new projects for next year.....and somehow I can't help but include these quilled teddy bears in it. But I wanna try to make them smaller in size......so I tried to make some mini teddy bears today. Mini "chubby" teddy bears actually...hehehe....:D

I realised that this mini teddy bear is as small as it gets! I can't make them any smaller than this. Especially the ears! It's so difficult to make the ears of the teddy bears with my chubby fingers! I can't seem to shape a tinier ear hahaha! So these ears I made for my mini teddy bears are as small as it gets! Ha!

So you can see from the photo above how small the mini teddy bear is compared to the quilled teddy bear I've made before. I made the coils of the belly a little loose for the mini teddy bear, instead of making a big tight coil like before ....simply because I wanted to make it  look a little different from the teddy bears I've made before. No other special reasons. 

Oh! Noticed how I've made those mini teddy bears in many different colors? hehe! I've tried combining shades of brown with blue, red, mustard yellow and pink before but never the made the teddy bears in one singular color. So I just did it to see how it turned out. I kinda like it a lot actually! ;)

I'm not gonna make a face for it though. It's plain.....and simple. Will think of another way to make it look a little special. Will just have to wait and see what I come up with hehehe. Till then!! ;)


Thứ Bảy, 25 tháng 12, 2010

Chubby heart


Which one you love best?? The chubby heart on the left or the slim heart on the right? hehe! I am finding it hard to decide because I kinda love them both right now. Originally, I have been making the quilled heart card using the slim heart template but recently I got a request from a customer to make the heart look a little chubbier. And so I did it!! As per request. ;) She is very happy with it of course hehe....but the whole idea got me thinking...hmmmmm ;)

You see...when I think about it, perhaps the chubby heart should be made on a bigger card to make it look  more balanced? What do you think? Because all this time, I've been making those hearts on that small card with that particular slim heart size and I've always thought that it's the right size of heart for the card. Now, when I look at the chubby heart, I question myself whether I should be making them in that size or should I just stick to the original slim heart size. Decisions decisions! hehe! Should I change the size for good?? Or should I just do both hehehe! After all, art is subjective right? ;)

So..........I would like to know your opinion on this matter........which quilled heart card you love best? The chubby one or the slim one? ;)


Thứ Sáu, 24 tháng 12, 2010

Swap and shop!

Lin and Miyyah posing with our swap cards  :)

 Quilled card and craft goodies from Miyyah :) Love them!!

YES!!!! I got the chance to meet up with my crafty friends recently during my trip to KL. Although it was quite a brief meeting, still we managed to do a few wonderful things together. One of the things  that we did was to swap cards with each other. :) Love that!

This time around I swapped cards with Miyyah from Miyyah@Kertas and also with Sazalina from Share.Your.Love.With.Cards. But Miyyah gave me more than just a card. She gave me so many craft goodies all wrapped up in a package together with her quilled flower card! Heaven! :)

  Lin and Sazalina posing with our swap cards...... :)
*Photo taken with permission from Miyyah@Kertas's Facebook album.


This is the card I received from Sazalina. Isn't it so beautiful? I love the beads that are used to decorate the card. Most of her cards have those type of beads decorated on it. I simply adore the idea :). 


These are the craft goodies I received from her a few weeks before the meeting....so sweet! Love the ribbons especially! :)


Another activity that we did other than swapping cards was trying out Sazalina's Cuttlebug machine while having lunch at McDonalds! hehe! Here is a photo of Sazalina with her Cuttlebug. I love that machine!!! And I even got the chance to use it during our meeting. It was so cool and I was so super excited about trying it out for the first time.

*Photo taken with permission from Miyyah@Kertas Facebook photo album

Here is a photo of me looking as giddy as a school girl when trying out the Cuttlebug machine hehehe! Can't explain how excited I was playing with it. It's like a dream come true! hehe! Me and Miyyah had no idea how to use it....we were totally clueless. But we got lessons from Sazalina on how to use it and  it was a surprise to us that it's such an easy machine to use. It's so cool! I love that it can cut so many types of design and emboss patterns on  the paper too using the variety of templates available. I can play with it all day!! I want one!!!! :D

After the brief lunch, we headed towards Kajang where Sazalina took us to visit a craft store called Scrap n Crop. It's in a housing area. The minute we entered the house I was so amazed by the amount of craft tools and materials sold there! I went googoogaga and lalalalalalala! hahaha! It was one of those moments when you feel like you just got hit by the love bug. Fell head over heels over the many many craft items showcased there. I could hear my head playing the Frank Sinatra's song......"Heaven....I'm in heaven.....and my heart beats so that I could hardly speak......" heheh! :D 

 Sazalina inside Scrap n Crop shop. 
*Photo taken with permission from Miyyah@Kertas Facebook album.


I didn't take any photos while I was there. I was too busy looking for what to buy and what are the latest cool craft items there...hehehe! What can I say....all I could think of is....can I "camp" here?? Feels like there isn't enough time for us to spend there. Before we know it, it was already time to go home huhuhu! I did manage to get me some stamps though from Scrap n Crop hehe!


As you can see, I didn't buy a lot....just some stamps to inspire me hehe! There were so many clear stamps there that I wish I could own. They are so beautiful!! But unfortunately very very expensive for me to buy. So I just kept admiring them up close hehehe! I definitely had a great time there and honestly I just didn't want to go home. I hope to be able to go there again someday!! :)

A personal thank you to Sazalina..... I couldn't have gone to Scrap n Crop without your help. I really appreciate it!! We must do this again!!!! :) Thank you for everything dear! hehe!

Although the meeting was quite rushing....we did everything in a hurry because of the limited time we had. I truly enjoyed the company. Thank you Saza...Miyyah and Ayin.....hope to meet you girls again soon!! And hopefully we can spend more time crafting together! :)


Thứ Năm, 23 tháng 12, 2010

Multi function tool


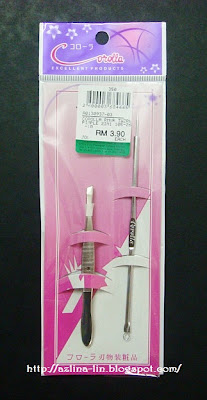
I was searching for this acne + blackhead extractor tool at a few places in Alor Setar but I finally got a good one when I was in KL recently. I bought this at the Mydin's Store in Jalan Tunku Abdul Rahman. It only costs RM3.90 and not only did I get this tool, but I also got the eyebrows plucker together with it. A good bargain! You can use the eyebrows plucker to pick up small craft items. It's also great when you need to glue small pieces of paper and other small craft objects onto paper/card.

Yes! You can actually use these tools for crafting! Yup! Amazing isn't it? You can actually use the sharp end of the acne extractor tool that looks like a needle for the quilling technique and also for making holes on paper. The needle is very very sharp and it can poke through the paper really well and it makes a very neat and small puncture on the paper too. Once you have punctured the paper with the sharp needle tool, you can sew a thread through those holes. Cool ya? Do view the photos below for examples on how you can use the needle for making holes and sewing thread onto paper.


Note: These small holes made by the sharp needle from the acne extractor can only fit in fine thread like the  dark blue thread you see above. For thicker thread like the ones used for crochet or cross stitch, you would have to poke the paper using a bigger needle to make bigger holes on the paper. :)

You can also use the sharp needle from the acne extractor to QUILL! Yes! I've tried it and it works wonderfully! I love it! See how I do it from the photos below :).


I simply love how the petals of the flower has a small hole formed inside it. If you use a slotted tool, you won't  get that effect, and if you use a finer needle, the hole inside the petal will be much much smaller as well. So now, for those who cannot afford to buy original quilling tools, I hope you can use this tool as an alternative to quill :). Using a bamboo skewer may not be a favourite for some because it's easily breakable if you are not gentle with it. So using this acne extractor can be your solution. The choice is in your hands :). All the best!!


Chủ Nhật, 19 tháng 12, 2010

The Golden Ladybird


Finally my ATCs are done! But, I'm not sure if they are good enough for the swap hehehe! It's a very simple drawing. A bit too simple I think. Don't you think so?? :D I'm so embarrassed!! I thought of doing something that has relations to our culture or environment as suggested by a good friend of mine but in the end.....hahaha, this is what I came up with. :D

I'm finding it hard to draw anything lately......and all I can come up with are those swirling lines that I kept making with some so called swirling leaves attached to them. The golden ladybird is supposedly a symbol of  ME. ;) I used to be called a ladybird by my cousins when I was younger........don't ask why coz I have no idea why either huhuhu....

But I do love ladybirds and I used to love searching for them in my Mom's garden. It's quite difficult to find them now these days at her garden, but there were plenty of them way back when I was younger and still schooling....hehehe.

I wanted to color my drawings but I think I've lost touch with my watercolor skills and right now I am only interested in doing line drawings. Black and white preferably. But in the end I decided to use silver and gold  metallic pen instead to color the drawings I made with pencil. I love drawing with pencils.....it's kinda therapeutic as well. I can just keep on drawing and drawing with it with no particular theme or subject.....just draw my heart out...hehehe :) I mean, I draw with my heart.....not my mind.....whatever comes out of it is a reflection of what's inside my heart ;).


Thứ Năm, 16 tháng 12, 2010

My free cards are HERE!!!


My favourite among all the cards received, especially since my name is printed there on the card hehehehe! :)


I am so happy today!!! I got my free cards from Cardstore.com! Woohoo! Unfortunately......huhuhu.....it got a little wet....just a little....because of the rain. And again.....the postman threw the package on the floor!!! Urrrgghhh! He is just so impatient.... :(. 

The sad thing is, the package was not protected with any kind of special casing. The cards were not even individually sealed in plastic. So as a result, 2 of the cards received were a little affected by the rain...huhuhu. Just a little though huhuhuhu. :(

All the envelopes are white in color. That's a little boring for me since I love colorful envelopes hehehe....but I do love all the cards. I don't think I'll be using any of them at the moment. I'm keeping them for myself because I love to collect greeting cards especially the kind with special graphics like these. :)


Thứ Tư, 15 tháng 12, 2010

The White Nativity is HERE!!!


It's here! YAY! Finally!!! Been waiting for the gift I won from Cheryl's blog candy for over a week now and finally I got it! Actually it arrived a couple of days ago but I was too busy with work to take photos of it and blog about it here. I was going to blog about it after taking a photo of myself with the White Nativity nicely arranged in my studio but I can't wait any longer for that to happen, I just gotta blog about it now! hehehe!

I was really really upset actually with the postman. He threw the package on the floor!!! Arrrggghhh! I wasn't home when the postman came over to our house and I suppose he didn't want to leave the package on top of the concrete fence at our gate, so he threw it under the roof so that the package won't get wet if it rains. :( Luckily the package did not contain any glass products otherwise it would be shattered into small teeny tiny pieces. Thank God when I opened the package everything was in good condition. Luckily it didn't rain as well....otherwise it would have gotten wet.

When I opened the package......wow.....I was really surprised at how neatly the White Nativity was packed inside it. How pretty too!! With ribbons and all.....so nicely done. Cheryl included a note in it too! How sweet! I want it to be in my studio where I can view it everyday hehehe! ;) So I arranged them in my glass cupboard along with my other ceramic creations. :)

The White Nativity is so cute! I imagined it to be big in size but when I opened the box, that's when I realised how cute it was! I love the paper used to make the White Nativity.....it's so beautiful. So neatly done as well.

Thank you so much Chery...... :) I can't stop smiling!!!! Big smiles!!! :) :) :)